Showing posts with label baking. Show all posts

Wednesday, 18 September 2013

Saving the (Birth)day!!

My twin girls had their birthday last week, and as usual, in the lead up to the Big Day, we talked about the Birthday Cake/s they would like me to make for them. 
 
I thought I was so clever.
 
"Girls, this year for your birthday, you can share one decorated theme cake or you can have an easy cake each." (FYI, an Easy Cake = coloured icing with Smarties and Freckles on top, my supposedly failsafe, go-to method for cake decorating)
 
"Easy cakes, Mummy!!" they shouted.
 
 See? Easy!
 
 
Until Miss J, on seeing her baked, circular and cooling-on-the-rack cake, burst into tears.
 
"But Mummy, my cake is meant to have straight edges."
 
What??
 
"And where is the beach and water going to go? I had a dream about my cake. And what about the boat?"
 
Er... what boat, my darling?
 
"Izzy's!!!!!"
 
Er... who is Izzy?


Izzy, it turns out, is the girl character in Miss J and E's current favourite licensed animated series which includes automated sailing ships, a captain with a hook, and a cheeky flying boy in green clothes who helps to save the day.
 
Quick! Grab the DVD cover, copy it twice, cut out, laminate, trim, and stick into icing on cakes between some Smarties. Phew!!
 
And of course, in the midst of all the birthday party craziness, the only photo I managed to take was one after everyone had left. Not an Izzy to be seen anymore, but I remember what the cakes looked like.


In fact, I'm thinking I will never, ever forget.


Do you have a favourite cake decorating moment? Or technique?
Do you have any stress/time saving ideas for kids' parties? Successful and not so successful ideas (like mine!) are most welcome - I have another party to organise in three weeks and I could do with all help I can get!!

Have a great week!

 xx

Thursday, 26 July 2012

Party Food + Hidden Vegies!!

It is birthday party season in these here parts, and when a tray of food is requested or required to assist the party hostess, I always make these - Pizza Rolls.

I love them! They meet all my essential kids' party food requirements:

- they are easy to prepare beforehand, freeze, and then reheat
- you are always left with an empty plate (adults like them too!)
- they are low in fat (provided you use reduced fat ingredients, of course!)

and, best of all in my mind,

they contain Hidden Vegies!!!

In the 5 years I have been making these I haven't been following a recipe but an idea a friend gave me. These amounts of ingredients are what work for me - by experimenting with amounts and different fillings, you can adapt this to work for you too. One piece of advice about the cheese, though - don't put in too much or it just melts out of the roll and onto your baking sheet or oven floor! Trust me!! 


Pizza Rolls

makes 24 rolls

3 sheets reduced fat puff pastry
1/4 cup tomato paste
1/4 cup tomato sauce/ketchup*
1 1/2 cups finely grated carrot
1 1/2 cups finely grated zucchini
2/3 cup grated mushrooms
1 1/2 cups grated reduced fat cheddar cheese


Preheat the oven to 200°C fan forced. Line a baking sheet with baking paper.

Without removing the plastic backing, thaw the pastry just enough so it is no longer solid - you will need to roll it up, so the pastry can't be too hard or too soft. Place one of the pastry sheets on a chopping board.

Combine the tomato paste and sauce in a small bowl. Spread the pastry sheet with 1 heaped tablespoon of the tomato sauce mix, leaving about 2-3 cm of the upper edge of the pastry free of sauce, and 1cm on the lower edge, as can be seen in the photo below.


Take about 1/2 cup of grated carrot and spread it evenly over the tomato sauce.

Take about 1/2 cup of the grated zucchini, squeeze out the excess liquid into a spare bowl, and then spread it over the carrot. Follow this with some of the grated mushroom.

Finish with about 1/2 cup of the grated cheddar cheese and use your hand to flatten it all down, still leaving the upper and lower edges of the pastry free from filling, as in the photo below.


Now it's time to start rolling your pastry. I use the backing paper to help me, removing it as I roll. It takes a bit of practice but it is possible!

Once the roll is complete, pinch along the edge to stick it to the wall of the roll so the whole thing doesn't come apart in the oven and spill out every where! You could also use a pastry brush to apply lightly beaten egg along the join to stick the pastry but, given the number of children with food allergies, I prefer just to pinch it together.


Using a serrated knife, cut the roll in half, cut these pieces in half again, and then once more. You should end up with 8 pieces. Place these on their sides evenly spaced on the lined baking sheet.

Repeat these steps for the second and third pieces of pastry.

Once all the pieces are placed on the baking sheet, bake in the oven for about 14 minutes or until golden and cooked.

Remove from the oven and cool for about 10 minutes before eating. Yum!!


Now, if you want to freeze them for a later date, only bake them for 11 or 12 minutes. Cool completely to room temperature, place in an airtight container and freeze for up to two months. When you want to reheat, remove them from your freezer and thaw to room temperature before placing in a 200°C fan forced oven for about 6 minutes or so.


Yum Yum Yum!!!


Pizza Rolls, anyone?


Sam xx


 * I like to use my homemade spicy tomato sauce

Sunday, 22 July 2012

Apple Butter Cake

One of my favourite jobs to help with in the garden is pruning the fruit trees - and that's what we did this weekend.

Yesterday we picked the last of the Lady Williams apples, stripped the remaining apple tree leaves, and pruned the branches ready for the new fruiting season.


And today, after we juiced the apples, I made Apple Butter Cake. Yum!


Apple Butter Cake

185g butter, softened
1 teaspoon vanilla extract
2/3 cup caster sugar
3 eggs
1 cup self-raising flour
1/2 cup plain flour
1/3 cloudy apple juice
1 Red Delicious apple (I used Pink Lady)
1 tablespoon demerara sugar (I used brown sugar)
1/4 teaspoon ground cinnamon

Preheat oven to 180°C (160°C fanforced). Grease and line a 20cm springform pan.

Beat butter, vanilla and caster sugar until light and creamy. Add the eggs, one at a time, beating well between each addition. Gently stir through flours and apple juice in two batches until combined. Spread the mixture into cake pan.

Cut apple into quarters and remove core. Slice into very thin strips. Place apple slices in two circles around cake so that they overlap each other. Make sure that the centre is well covered. Sprinkle apples with combined demerara sugar and cinnamon.

Bake in oven for about 1 hour or until cooked when tested with a skewer. Allow to cool in pan for 5 minutes before turning out.

Serves 8

( Recipe from P41, The Weekend Australian Magazine July 23-24 2005)


Did you have a beautiful weekend?

Sam xx

Tuesday, 19 June 2012

Rainy Day

A rainy, grey day.

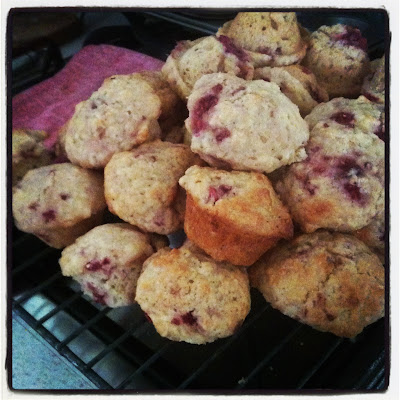
The twins and I have been baking raspberry muffins and pizza bread; the latter with some of the leftover flatbread dough that has been lurking in our fridge! Yummmmm.


And, in a quiet moment, there has also been a little bit of knitting taking place as I catch up on last night's Masterchef episode before I cook dinner, pick up Miss M from school and head down the hill to her ballet lesson.


It is a very short-lived quiet moment, I might add!

All this while I anxiously wait for the Computerfixit man to call regarding the Sam-inflicted computer illness.

Patience. Patience........


Sam xx


Wednesday, 13 June 2012

Bread

Without really realising it, I have got to the point where I am baking almost all the bread that our family eats, which, for a gluten intolerant girl, is rather a feat!

I originally came to the process of kneading the dough from a potter's point of view - to mix the clay and to remove air bubbles. In more recent times I have used my beloved bright red Kitchenaid mixer to do the kneading as it helped to save time.

So it was a very different experience for me when, on Sunday night due to a power outage, I hand kneaded the dough using the technique described in the River Cottage Handbook No.3 Bread, by Daniel Stevens.

It's brilliant. And, after leaving the dough in the fridge for the night as well which helped to develop a more mature flavour (and also helps break down the gluten to make it easier to digest), I found the resulting texture of the flatbread to be far superior to the bread I have made in the past.


Ah, yes, flatbread. My family's new passion. It is definitely a more time intensive process but the resulting bread gets quickly gobbled up. And, even though my oven is now working again thanks to two new elements, I will be continuing the flatbread baking for some time to come.

Yum!

Sam xx

Monday, 4 June 2012

No more buns for this oven!

On afternoon Friday I was super organised - fruity beef casserole prepared and in the oven, three lots of bread ingredients measured and ready to go, one already mixed, kneaded and rising, and the potatoes for the mash washed and ready to cook.

Right. It's just after 5, the casserole should be bubbling away nicely. Let's just check it to see how it's doing.......except, it's not. Doing anything. It's just sitting there and hasn't cooked!

Hmmmmm. Don't panic. Yet. Check the dials. No, they are set to the right positions. Has there been a power failure? Of course not - the clock is still working.

Oh.

My oven is dead!

Okay. Decant casserole into slow cooker for dinner tomorrow night (it was yummo, by the way!). Rustle up carbonara for tonight. But what about the bread?

Wait a minute! Why not flatbread, a la River Cottage bread man? Remember that little book I referred to in this post? It's the River Cottage Bread Handbook which I have lovingly read. It's very thorough and I have been using some of his techniques but not yet his recipes. Time for more technique - flatbread technique!


And the technique, you can see, is rather simple. We set up a production line and, in the end, Miss M was running the show (with supervision on the side from me, of course. She is only 5, after all!).

We had hot flatbread for breakfast - with butter and honey. Yum! Flatbread for lunch - did you know it turns into pockets like pita bread? Ours did, anyway.

Double Yum!

I'll be making more flatbread tomorrow morning, too, while I prepare for discussions with Mr Ovenfixitman. However, while we may have stove-top bread, it seems unlikely that there are any more buns for this oven! Ha!

Sam xx


P.S. I hope, if you are from WA, that you had a great Western Australia Day holiday today, and a fabulous long weekend. We went camping. More on that tomorrow. After I get some sleep!!

Wednesday, 16 May 2012

Baking Banana Bread

I have been baking banana bread* for today's Kid On The Couch.


The trouble is, the only person who seems to be eating it is the big kid in the kitchen!


I always bake when the children are recovering from illness - I've got some bread on the go at the moment as well. Mmmmmmmmmm!!!

And did you see the book on the table behind the banana bread? The recipe for the banana bread didn't come from that (see * below) but hopefully my future bread making attempts will. The girls (and G!) gave me the book for Mother's Day.

Miss M is well and truly on the mend - she's just VERY tired!


When do you like to bake?

Having lots of baking fun!

Sam xx

* Easy Banana Bread recipe from Donna Hay's 'No Time To Cook' recipe book.

Tuesday, 10 April 2012

So much Chocolate!!

It's Easter Sunday - and it's also G's birthday which means a cake is required.

I know, I know. We only just arrived home from camping but I'm still going to make my beloved a cake. Only problem is, he likes chocolate cake and, if it's going to be a birthday cake, it has to be chocolate. Funnily enough, chocolate is something I seem to have a lot of today. We even found some hidden away in the cupboard from last year!

So, I made my no-fail, ever-faithful chocolate cake recipe which you can find here and here. And I used good chocolate - good chocolate Easter Eggs! See it in the photo? But the cake mix didn't seem to do well - it seemed to separate.

Hmmm. What to do?

Persevere!! No time to dither. Parents are on their way here for husband's Birthday Celebration. Get On With It.


There. The cake is ready to go in the oven, covered in Easter Eggy chocolate chunks.

When the decorated cake is presented I tell my mother that the ingredients didn't amalgamate as well as usual. See? See how buttery it is? Not as successful. The cake isn't anywhere near as good as it usually is.


Not it isn't.

It is BETTER! It is really, seriously good; moist, luscious, dense. Mmmmmmm. Chocolate!

You just have to wait until it is totally cool - the next day is best!

So I can safely say that the recipe for the Melt-and-mix chocolate chunk mud cake is truly a Very Good Recipe.


What are your fail-safe go-to recipes?

Having lots of chocolatey fun,

Sam xx


Sunday, 1 April 2012

Weekend

The Easter Bunny visited our Playgroup on Friday.


On Saturday we made a Marble Cake for the cousins' Birthday.


We visited the Art Gallery of WA on Sunday to see our cousin's artwork in the Year 12 Perspectives Exhibition (what a very clever girl A is!!).....


..... and then played in the senses playground outside Perth Museum.


We went to Gandma and Grandpa's for the cousins' Birthday where we gave the beautiful cousin A her going-away present (Fable Fingerless Mitts).....


..... and ate lots of cake. Yum Yum!


Then we blobbed blobbed blobbed all the way home!!


Sam xx